Introduction To Resin Wood Art
Resin wood art has caught on to become one of the cool kid things to do in wood art. I am more of a traditionalist in this as I see it as altering the natural state and beauty of the lumber.
Nevertheless I will admit some people create beautiful work. Epoxy Resin does have very practical uses along with its capacity for art.
Up front let me say that this stuff can get expensive. Two liters can run 100 dollars without flinching. Making rivers or joining live edge pieces together you may need more.
If you can handle the price tag then there are some really cool things you can do with it. Nevertheless note that these products remove the natural wood texture by touch within the hands.
Resin Art Basics
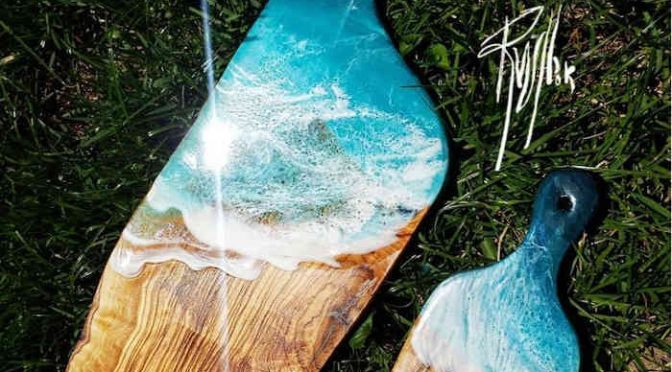
Allow me to give credit where credit is due before I continue. All images in this article come from Artist Rachel Walker-Hook. I would link to her website for you but as of this writing it is down.
Hopefully I can later revisit this and give appropriate links for proper credit. I discovered her work and it is some of the most unique I have seen.

Essentially epoxy resin it is a two part product. A wood hardener is mixed with the resin.
Different products have varied specifications but all essentially work in a similar way. Allow the needed time for the epoxy resin to dry and harden then it is done.
To accomplish this you will need to make a form of some kind. You are after all pouring a liquid to create a bond within the wood or between two wood pieces.
To make this form I have seen people use many techniques yet some work better than others. The most basic is to create a wood framed form that has its cracks sealed with silicon.
Alternatively tape can be used to create a seal so the liquid does not escape and leak out. I would personally opt for the silicon route.
I like tape but it can be a royal pain at times. It really depends on what your form, design, and purpose is for as to which route would be best.
Many people use a furniture wax to coat the form with in order to help prevent the epoxy resin from bonding to the form. This doesn’t mean that there will be no separation anxiety between the wood and form but it does make life much easier.
Once poured into the form with the surrounding soon to be wood art just smooth and allow to dry and harden. It really is simple in concept but it can take a lot of preparation and time.
Before beginning be sure to know OSHA standards for the products and potential health and safety issues surrounding them. Due to the variety of products on the market they may differ in content and impact on you and your environment.
The Practical Benefits Of Epoxy Resin
Epoxy Resin is not something you would use on generic cheap lumber unless one may be practicing or experimenting first. Due to its costs, for me to use it requires a practical reason and application.
General wood hardeners are more commonly known for most diy application around the home.
Let’s face it, I carve wood and personally love the natural state of wood over plastic. Although this method is a great waterproofing for wood.
Those of us who are deep into the wood art scene often run across very beautiful pieces of lumber that just cannot be normally processed. Cracks, splits, knotted wood, or even some rot may ruin an otherwise beautiful piece.
Here is where resin steps in to save the day for me.

These boards can still serve in items like cutting boards or serving trays. Obviously other ideas apply yet you get my point.
If you clear out the weak portions of the lumber that was caused by rot or splits in the wood you then have your starting point. In this case you have some choices to make.
You can use the resin to simply fill the gap and create a solid bond or coat the entire piece of wood. Personally I would rather minimize the resin use to the areas affected allowing for as much natural wood beauty to be displayed as possible.
Yet to each their own in what you like. My thing is wood carving more than epoxy.
There are times when coating the entire board may be needed. If the lumber is weak or in question of living up to daily use, then epoxy resin may be required.
In this way the wood will be inside the resin body which surrounds it. Indeed the dollar signs flash before my eyes at the idea of doing this.
If one desired, a colored epoxy resin could be used first to join any broken pieces of the wood. Once dry, a clear epoxy resin can be used to pour over the entire piece of wood.
In this way you have a more unique piece with beauty.
This is not an application that I use often. Simply put it is not my thing to do.
Anything that takes away from the natural beauty of the wood and its grain is something I typically avoid. I want the feel of the wood in my hands as well as the visual appeal.
Nevertheless these techniques do have a practical application in how one could approach their use. For that I can appreciate its purpose and the added artistic flair that can be added.
In my mind once the lumber is no longer recognizable or felt in the hands it has lost its purpose in being called wood art.
Issues To Be Aware Of With Epoxy Resin
Read instructions and follow them please. Not all epoxy resins are created equal.
As with most things in life you get what you pay for so understanding what you need in application helps. That is why this article is not a catch all DIY on how to do this. There are different applications.
Of the things to look out for is the chemical composition. The last thing you need is the end product turning out yellow or murky when you were expecting clear like glass.
By its nature epoxy has a tendency to want to yellow as it hardens. The cheap alternative products you can find out there make this far more noticeable, and some are unusable.

When poured it should not be like water. The epoxy needs a bit of body to it, or in other words a thicker consistency rather than thin.
When pouring two colors at the same time the color needs to interact for design creation rather than mixing into some 3rd unsightly color.
Another issue that catches people off guard is how thick of a layer that they can do in one pour.
Different products are rated for different thicknesses. When this stuff is used the hardening process generates heat. In turn this can damage the end product or the wood it is being used on.
Depending on the product you select it may be that you need to do multiple pours to achieve the thickness you desire. If you get lucky and do not mind paying for better products, you might find the application color and thickness you require all built into one product.
Unfortunately at times you may get stuck using a epoxy resin which provides an aspect you want such as color selection, then adapt its use in application. Sometimes there is not a one size fits all product in what you are seeking to accomplish.
This is also why I am not here recommending one product here over another.
Some like using floor epoxies for they are made to be used in thicker applications. Other brands are made to be used giving nice body with the initial pour on applications like tables. Yet I may offer a small piece of advice here.

Though the product may be rated to a specified thickness in one pour, it may be best to not push that limit especially if clarity is what you wish to achieve.
The thicker the pour the more likely problems are to occur with yellowing or other potential side effects from heat and hardening. So use some common sense with the application to achieve the goal you have in mind.
If by chance you get a resin that is designed for thick pouring there is another important component you want to have. Self leveling resin is really a nice feature. This allows for things to become a bit more forgiving.
One last warning. Pay attention to any toxic fumes that the product may give off as it is mixed to when it is hardened. The moment the two parts come together at the point of mixing the chemical reaction begins. It is a time based reaction.
With this some products can give off toxic fumes that you do not want to be around. Some offer non toxic solutions yet those may not be applicable to your solution.
Having some air venting the fumes will require more than the typical woodworking dust collection system. If your unit vents to the outside then that is a major bonus.
Advice For Beginners
I have used the stuff many times yet I still would call myself a beginner. I say that for there are people out there that can do amazing designs with this stuff that I have never tried.
Yet in terms of those who have never used epoxy resin I can help you with this next piece of advice.
Start small. Do not jump into trying to do a table as your first project. There are nuances to this that you just have to pick up and learn along the way.
Clearly it is one of those things where someone who has done a lot of it can make it look easy. Indeed in concept it is easy. Application can get tricky for a beginner.
Start with a small board that you want to fill or join. Play with the color application that you will want to work up to in a larger piece like a table.
Start to get the feel of how it will finish. After this you can play with how that product cuts and sands. This leads to the next property about these products.
Cutting, Sanding, And Finishing Epoxy Resins
Here is another critical component of getting what you pay for. Quality brands can be cut and sanded in finishing just like wood can be.
There are some clear differences in how far you have to take some aspects like sanding.
I know a lot of woodworkers that stop sanding around that 220 grit range. If you remember earlier I mentioned how I personally like the feel of the wood in my hands. I like that 220 grit feel after sanding. It is smooth enough without removing the natural feel.
When it comes to these epoxy resins you will most likely need to push past the 300 grit range. I have known some to go into a grit that is often used in auto body work.
In reality it my require going as far as 3000 grit to obtain the smooth look and feel with no visible scratches being seen. Buffing may also be required.
A lot will depend upon the brand epoxy you use and the application that you are using it for. It can help to play with a few different products to see how they finish and what you like.
Some may require more work than you really wish to put into them. Others may give the desired appearance with a little less elbow grease.
My Personal Tastes On Epoxy Resin
I will use epoxy resin for saving boards that otherwise would be rendered useless. I have no desire to get into some of the exotic arts that people can create with it.
I do appreciate the beauty of some designs that are created. Yet this art medium is one that you have to love creating with in order to make it a primary medium.
At the end of the day to me it is like hardened plastic. The texture in art is lost when epoxy is used. Yes it can be pretty, but it still is plastic.
Using it to create a feature within wood such as a river in a table definitely has a cool factor for your room. Yet it is an accessory in the toolbox to use when needed rather than the primary method of application.
Nevertheless if you have creative designs which you have made feel free to share them with me. In time I may include them on this page or others concerning wood art. It would be cool to display others work in areas that I do not specialize in.