What Is Chip Carving?
Chip Carving is an older way of creating decorative designs within wood. It utilizes basic woodworking knives, pressure to make a cut, and removing small chips.
It is among the easiest methods of decorative wood carving that you can learn. It is also inexpensive to add as a method to enhance your projects.
The foundations for this carving method is merely a sub category of wood carving. It is a method within its own right that is tailored for decorative design and aesthetics.
History Of Chip Carving
You can look at every culture around the globe to find that each took part in chip carving. It did not matter if they were closed off from other cultures for extended periods of time. Common methods were used among these many peoples.
These methods came to be by its mere simplicity. Early craftsmen inevitably would have no difficulty discovering its uses.
Due to this it is not possible to reach back through time to find one isolated place or people that developed these techniques. Yet there was a place where it held dominance and was perfected.

Chip carving came to its peak prominence somewhere between 1100 AD and 1500 AD within Europe. It would not be wood which made it famous, but rather it was by carving stone.
Masons of the time would chip carve stone to create decorative designs for churches and cathedrals. While chip carving was also done in wood, the greatest examples left to us from history is found in these stone carvings.
The wood carvings which did survive through time are also more prominently found within these churches. Few other wood structures or artifacts have survived across the centuries.
We know that by the 1700’s chip carving became a method to decorate furniture for homes. As these periods predated modern machinery, it was the primary and almost the only method which designs could be added.
In other cultures its use would be applied in similar ways. This remained true for people who lived more simple lives such as Polynesians that used chip carving for their boats, paddles, and tools.
It would not be until industrialization came to the forefront of industry that mechanized means would slowly begin to replace this older method. By the late 1900s computers would drive milling applications with cnc to perform these tasks.
If you were ever curious about how these designs and beautiful carvings came to be within wood, chip carving was the method which was most used.
How To Start Chip Carving
I am not going to insult anyone’s intelligence here by attempting to describe these methods by words. I will be up front and tell you that this is one of those skills that is best learned by watching and then doing.
Albeit I will also say that this is a great way to explore and learn how to make art with wood. It is worth your time learning.

There are many articles online which attempt to describe how to start in chip carving. May I rather suggest two options for you.
There are books dedicated to the topic which you can find. I will include some of these within the images of this article.
Likewise there are videos and woodworking classes you can find on YouTube to help you get started. Seriously this is far better to learn with than reading.
As this is a monkey see monkey do kind of art to learn, there are some tips I can give you to help you along your path. These tips can often be missed in many tutorials or videos as they can be taken for granted.
I will note here that if you are serious about Chip Carving then you may wish to look into whittling as well. These two arts can at times be closely associated.
If you chip carve on anything other than a wood panel, then the principles of whittling are directly tied to the function of what you are performing.
How To Transfer A Design To Wood For Chip Carving
This is one of those tricks where everyone can have their own method. I have used all kinds of ways to get a design transferred to wood. Some include projectors, stencils, and even free hand drawing.
There is an easy way to do this for smaller projects. Use your home printer. How does this work?

The ink that most printers use is heat sensitive. Print the design to paper. Take this paper and lay it on the wood with the printed portion face down making contact with the wood surface.
Take an iron, the same that you use to iron clothing, and apply heat to the paper. The heat will cause some of the ink to transfer to the wood.
This works best with designs which have prominent bold lines or shapes in the design. The thinner the line is the less ink will be there for a transfer to take place. As a result it may become difficult to accomplish this task.
Other easy methods will involve some improvisation. You can cut sheets of wax paper to the same size of printer paper. Then print the design.
After this place the paper face down on the wood. Use a block or card to rub the paper which will transfer the design to the wood.
This method can be a bit more troubling but it can work. Aside from these methods you can look into different types of transfer paper.
An alternative tool which can help you when chip carving is a marking knife. This knife allows you to mark the wood with ease where you intend to make cuts.
What Wood Works With Chip Carving?
Considering that in ages past craftsmen predominantly did chip carving in stone, it is very possible to do chip carving into any kind of wood. The question is, where to begin learning?
Basswood is often the recommended place to begin wood carving no matter the method you seek to use. To learn chip carving it certainly is a great place to start due to how soft the wood is and how easy it chips away.
The added benefit to Basswood is that the grain is undefined. Being as clean as it is, designs transfer easily and cleanly.

Softwoods are generally easier to work with in chip carving. I say generally for much can depend upon factors such as grain design, color, and how much sap is within the wood. Pine for example may become more stubborn than Basswood.
You might expect that hardwood would be more difficult to use within chip carving. This is not necessarily true. Hardness in Janka scale is what most people often refer to when speaking of soft or hardwood.
The key determining factor for chip carving is actually found within wood density. Along with this will be grain structure that can flip this principle on its head. I will give you an example here.
Cedar is softer by density than Maple. Yet due to the grain structure of Cedar you will find that Maple can chip more cleanly than Cedar. How the wood fibers form and bond to each other within the species can play a major role in how easy the wood is to work with in chip carving.
I would suggest that these principles be the guide as to what wood you begin working with. It is better than merely trying to rely upon a hardness scale alone to then become frustrated.
I will say that it can take some experimentation to discover what wood you prefer to work with. Everyone has their favorite for their personal tastes. There really is no right or wrong choice but rather it becomes your preference through experimentation.
Tricks To Adding Curve Designs In Chip Carving
You will see some designs that you swear were added by cnc wood carving. Yet they were rather done with a form of chip carving. So how do you add lines or curves to designs?
As you begin to learn chip carving a key element is pressure, depth of cut, and having multiple cuts meeting at depth.

To add a curve or line is rather simple. You apply the same principles long the length of the line. A more shallow cut will allow for an easier curve to be made.
After this initial curve is created you can then begin to define that curve or line with other carving tools. The chip carving may start the curve, yet a Veiner can clean up the line at depth.
A wood riffler can then smooth the line as needed to leave a cleaner finish within the cut. Each of these are very simple tools to use that are also relatively inexpensive.
It can be easier to start the curve with a modified chip carving method to break apart the wood grain more cleanly. This though will depend upon the wood species. More fibrous species that like to fur or tear can benefit with the method I described.
The idea is that you are creating a “tracing line” which the Veiner will clean up. In turn you are left with a well defined and clean carving.
Best Tools For Chip Carving
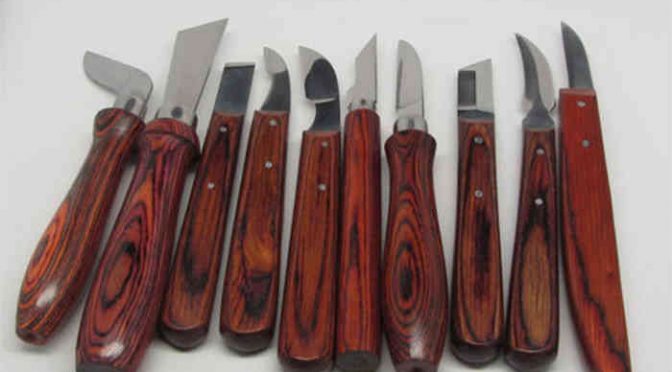
You will find many Chip Carving Knife sets online. Any of these are good to begin with in learning. Yet before it is over you will discover other tools that help your process.
Pfeil and Flexcut are two examples of companies that offer multiple knives for this purpose. The shape and design of the blade can determine how easy chip carving can be done for different designs.
The knife blade is made to plunge into the wood and be drawn forward. Thus the blade should be short and many are curved to assist in the plunge cut as pressure is placed on the top of the blade.
In terms of blade design, there are about 5 to 6 differently shaped blades which will help you. Avoid folding chip carvers. Fixed blades are better for long term use and are safer in my opinion.
If you wish to add more tools to aid in your chip carving, consider a wood riffler and Veiner of different varieties. There will be many other potential wood carving tools which can assist you for larger projects.
Inevitably for large scale work you will need to step up to something like wood chisels. The principle here is no different than when using a knife but methods do vary.
There are some differences in how the tool is used. With chisels a special hammer is used to hit the butt of the wooden handle. Instead of downward pressure it is light tapping by impact.
A major difference is that a chisel can not be drawn forward like a knife. So there will need to be accommodations made for this with angle, depth, and repeated chiseling along a line.
What Woodworking Projects Work Best With Chip Carving?
There are some projects that look really great with chip carving. Going back to the methods of the 1700s and 1800s you will find furniture as being one of these projects.
While not every hobbyist will take the time to do something of this scale, there are smaller woodworking projects you can pursue.
Box art is one of the more interesting. Personally I love making decorative wooden boxes. It is a great way for the hobbyist to create something really beautiful and also functional.
Small decorative wall pieces is another project where chip carving will thrive. Today items of this nature is mass produced so you will not be competing within a market. Nevertheless it is great for a personal touch to your home decor.
Taking a page out of history, customizing handles for household items can add another functional aesthetic. Here more care is needed to maintain the wood integrity and functional use. Nevertheless decorating handles for items can be beautiful.
Then there is the tried and true name plates, signs, and other similar concepts found in abundance across the web.
Chip Carving Is A Fundamental Woodworking Technique
While there are many vidoes and books focused on chip carving, know that it is merely one technique found within wood carving. I will say that it is a fundamental technique.
If you master this method then moving forward with wood carving into other horizons will become easier. The principles gained carry over in application.
Nevertheless for beginners, chip carving is a fun and easy way to explore woodworking. It is safe when you take the necessary precautions. Wear protective gloves and also keep your blades sharp.
Do not rush your project. If you need to pause in order to sharpen a knife, adjust a design, or make a cut safer, then accommodate for these needs. In the end the final product is worth the wait.